Creating Pre and Post Execution Reports
Execution reports are crucial for validating test execution and conducting analysis.
Opkey now includes a new advanced feature: Pre & Post Test Execution Report. This feature enables the export of both Pre and Post execution reports for Test Cases and Suites.
Pre Requisites for generating Execution report
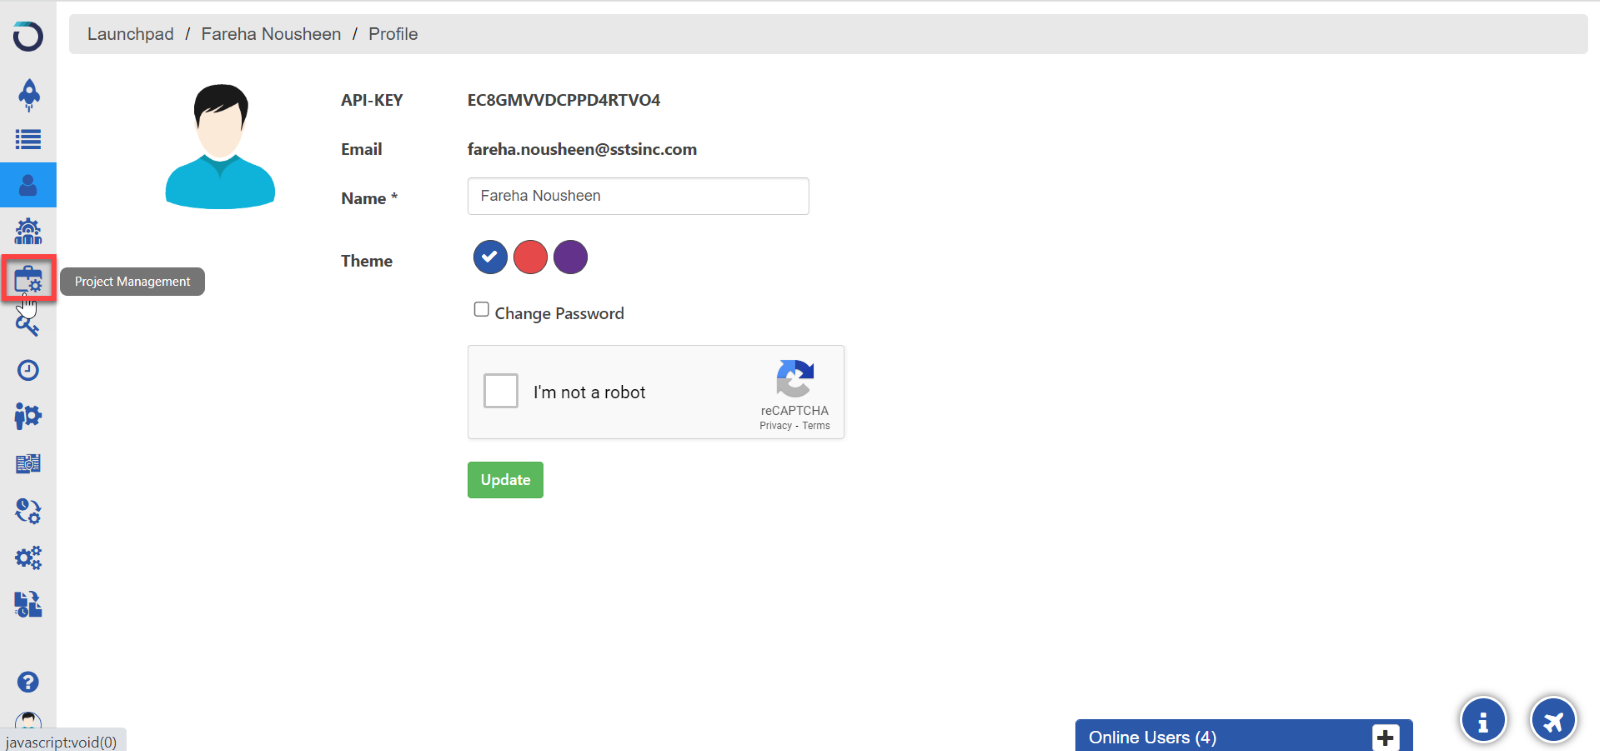
Login to Opkey Web and switch to the Opkey Admin Panel, by clicking the Profile button and selecting Settings from the options.

Go to Project Management.
Click on Report Management from the options.

Let's have a look at the tabs present on the Reports page.
Upload Template
Click on the Upload Template icon to upload a new report template if you have one.

Select the template and click on Open. Only a single template can be uploaded in one go.

Otherwise, you can download a sample Validation report by clicking on the Download sample template icon.

You can download sample report templates either in Doc or in Excel format.

The Sample Excel Report template can be seen in the below image.

After you have uploaded the template, you can update, export, and delete the uploaded templates, as required.

System Fields
Map the System Fields (e.g., Test Script ID, Test Script Name, etc.) in the Test Procedures table of the uploaded sample template to insert test data into the exported report.

Custom Fields
This tab lets you add fields in your report which is not present in the System Fields.
Click on the Add Tags icon to add a new tag which will let you differentiate between test cases.
Subsequent buttons will let you move the tags up and down and also let you remove the tag when required.

Critical Parameter
The Critical Parameter feature creates a detailed Excel Execution Report for Test Cases, showing parameter information from Function Libraries, including names, values, test case description, status, and timing.

Download the XML file for Critical Parameters from the download button.

Select the crucial parameters for inclusion in the report. In the XML file, specify the names of both Input and Output Parameters to be uploaded to the Critical Parameter tab.
Upload the data from the Upload button. Uploading data again will replace and update existing data in the tab, removing the old information. Click on refresh button to view the updated xml file.
Creating Pre-Execution Report
To generate a Pre-execution report for a Test Case, open the Test Case, click "Run Now," and then choose the "Generate Documents" option.

Fill in the required fields of Test Case Name, Report Name, Agent, Report Template, Steps Hierarchy, Format, and Report Logo. and click Next. Make sure that your Opkey Agent is online.
You can choose Step Hierarchy (One Level or Two Level).

Note: Step Hierarchy controls parent-child artifact organization. Choose "One Level" for only parent artifacts in the report, or "Two Levels" for both parent and child artifacts.
A new window opens up. Add Session Tags here (Key & Value).
Click Finish to start creating the Pre-Execution Report.

Navigate to the Test Case Document tab under the Details section to download the generated document.

Open the Test Case Document tab and Click on the Download Report icon to download the generated report.

The Pre-Execution Report will download as below. It will have key details such as, test case description, expected result, step result, screenshots etc.


Creating Post-Execution Report
To generate a Pre-execution report for a Test Case, open the Test Case, and then click "Execute" under the "Run Now" button.

Fill all required fields of Session Name, Choose or Create Build, Execution Agent Name, and Generic Plugin in the Local Execution Wizard.

Check the Show Advanced Settings checkbox and click Next.
On the next window, check the checkbox of Validation Report and click Next.

Enter details of the Validation Report, such as Template Name, Report Name, Snapshot, Steps Hierarchy, and Report Logo. Click on Next to proceed.
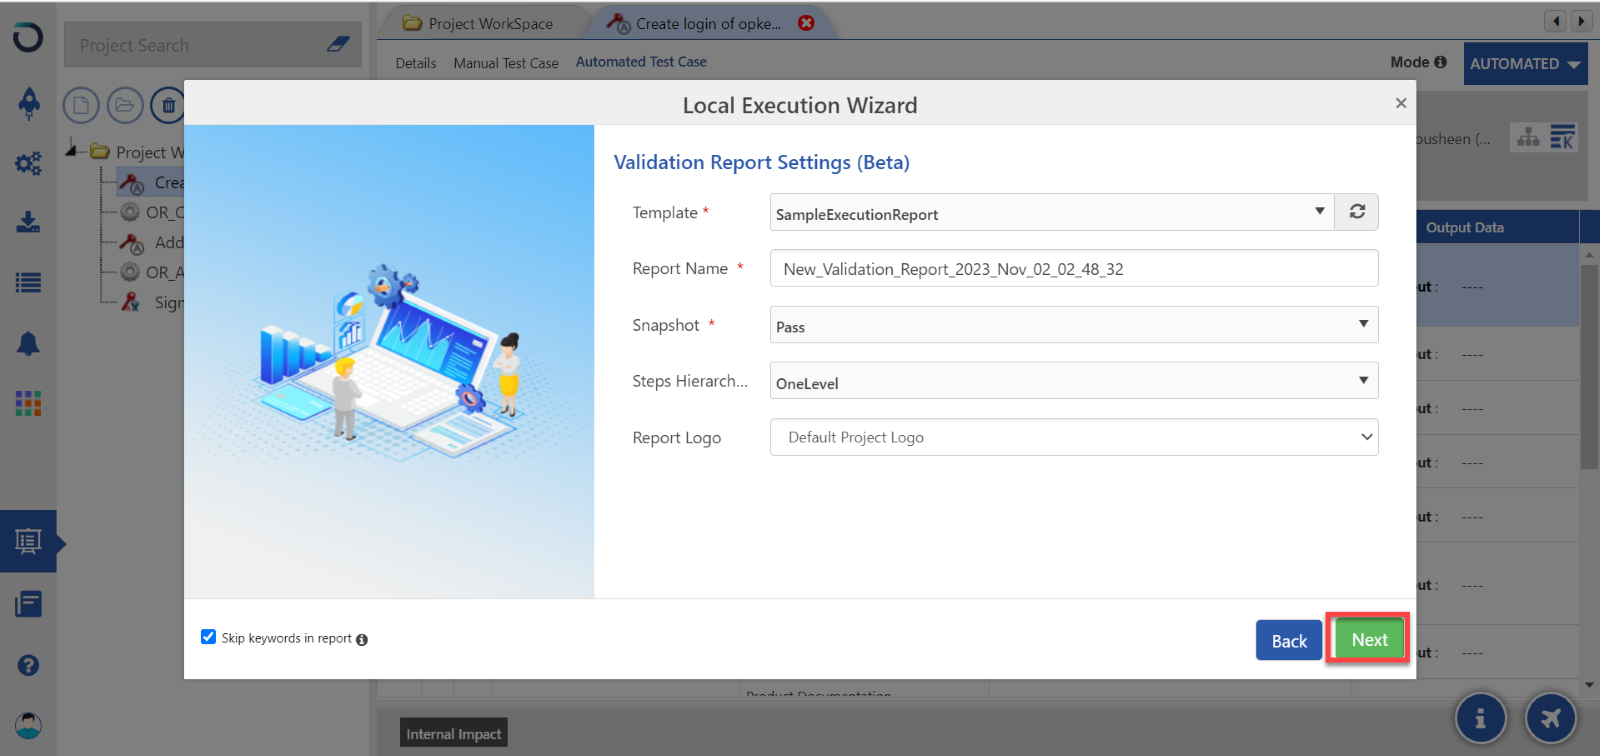
Click Next and then click Finish.
After successful test execution, navigate to the Execution Result tab of your project and click the "Export Report" arrow.

In the pop-up window, pick a Report Name, select "Validation Report" from the dropdown, choose a logo for your report, specify the preferred download format.

Then proceed to export the report.

Now, here you can view your exported Post Execution Report in Word format.


It can be downloaded in Excel format also.
Thus, we have successfully created a Pre as well as Post Execution Report.
Simplify your testing journey with Opkey. For more such related Opkey features Click Here.